Dumping iOS filesystem

Although iTunes backup offers a plethora of valuable databases and diagnostic data, there are situations where performing a complete filesystem dump becomes necessary. This process, however, is only feasible within a jailbroken environment for iOS devices. It entails installing an SFTP server onto the device and configuring specific entitlements using tools like ldid. Let's dive into how to create a full iOS filesystem dump.
Regardless of whether you create an iOS backup using iTunes, idevicebackup2, Files, or uTools, you'll encounter only two options: standard unencrypted backups with limited information or encrypted backups. To backup iPhone without iTunes you can follow our step-by-step guide.
Encrypted backups, safeguarded with a password, contain extra valuable records absent in unencrypted backups, including essential data like Safari history, Safari state, and other pertinent information. This significantly enhances the forensic insights accessible for analysis. However, it's worth noting that iOS system dumps encompass all the data available, providing a view for forensic examination. The process to dump iOS filesystem is straightforward.
Dumping iOS filesystem
To initiate the process of dumping the iOS filesystem, you must first jailbreak your device to gain root access. This can be achieved through various jailbreak tools like unc0ver, checkra1n, or palera1n. Once your iPhone or iPad is successfully jailbroken, you'll need to establish SSH access to the phone. Typically, this requires the use of iproxy, a proxy that binds local TCP ports to be forwarded to the specified ports on a usbmux device.
Follow those steps to dump iOS filesystem using iproxy method:
Step 1. Jailbreak iPhone with a supported tool following our step-by-step guides.
Step 2. Install iproxy app through libimobiledevice on your PC or Mac. On Debian/Ubuntu systems iproxy can be installed with libusbmuxd-tools package.
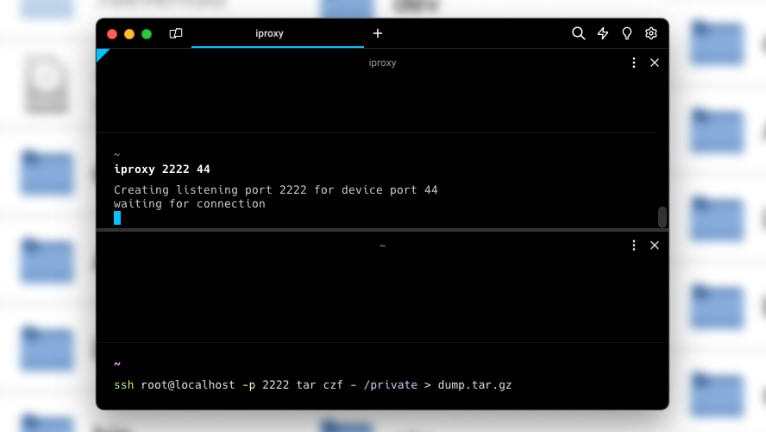
Step 3. Open the terminal app and run iproxy to be able to ssh as root to localhost on port 2222. Depending on jailbreak you might need to specify a different port number instead of 44.
iproxy 2222 44
Step 4. On your jailbroken iPhone open a terminal app like NewTerm and SSH to your computer as root to localhost on port 2222 and password "alpine" and save a tarball on the host of the "private" folder from iPhone. The dumpling process will take a while.
ssh root@localhost -p 2222 tar czf - /private > dump.tar.gz
Step 5. To extract the dump.tar.gz file, you can use tar command in the terminal.
tar -xzvf dump.tar.gz
An alternative method for dumping the iOS filesystem involves utilizing the sshfs tool, which enables you to mount a remote filesystem using SFTP. To accomplish this, you'll need to install the sftp-server on your jailbroken iDevice.
Follow those steps to dump iOS filesystem using sshfs method:
Step 1. Download locally a compiled copy of sftp-server for iOS.
curl -LO https://github.com/dweinstein/openssh-ios/releases/download/v7.5/sftp-server
Step 2. Upload the sftp-server binary to the iPhone.
scp -P2222 sftp-server root@localhost:.
Step 3. SSH into your iPhone and set some entitlements in order to allow sftp-server to run.
chmod +x sftp-server
ldid -e /binpack/bin/sh > /tmp/sh-ents
ldid -S /tmp/sh-ents sftp-server
Step 4. Create a folder on the host and use it as a mount point. Don't use the "/tmp/" folder.
mkdir root_mount
Step 5. Execute the following command for the mount point.
sshfs -p 2222 -o sftp_server=/var/root/sftp-server root@localhost:/ root_mount
To check and analyse the iOS Filesystem Dump you can utilize a tool like Mobile Verification Toolkit. MVT is a set of utilities to automate the gathering of forensic traces essential for identifying potential compromises on iOS devices. This toolkit proves invaluable in assessing whether an iPhone has been subject to hacking or unauthorized access.


