3 Effective Ways to Remove Black Bars from a Video

You’ve spent hours filming the perfect shot, editing the content, and lining up your audio—only to play back the final video and see those annoying black bars framing the footage. We’ve all been there. Whether they appear on the sides (pillarboxing) or at the top and bottom (letterboxing), black bars can ruin the viewing experience, especially when you’re aiming for a polished, professional look.
Black borders typically show up because of aspect ratio mismatches between the original footage and the platform or screen it’s being displayed on. For example, if your video is in 4:3 but you’re watching it on a 16:9 screen, expect to see some empty space. While there are valid cinematic reasons to keep these bars, if your goal is to remove them entirely, you have a few reliable options—each suited to different skill levels and devices.
In this guide, we’ll walk you through three practical ways to get rid of black bars from your videos using popular software tools. You’ll get a detailed tutorial on using Clipify, and two alternative solutions for Mac and professional editors using iMovie and Adobe Premiere Pro.
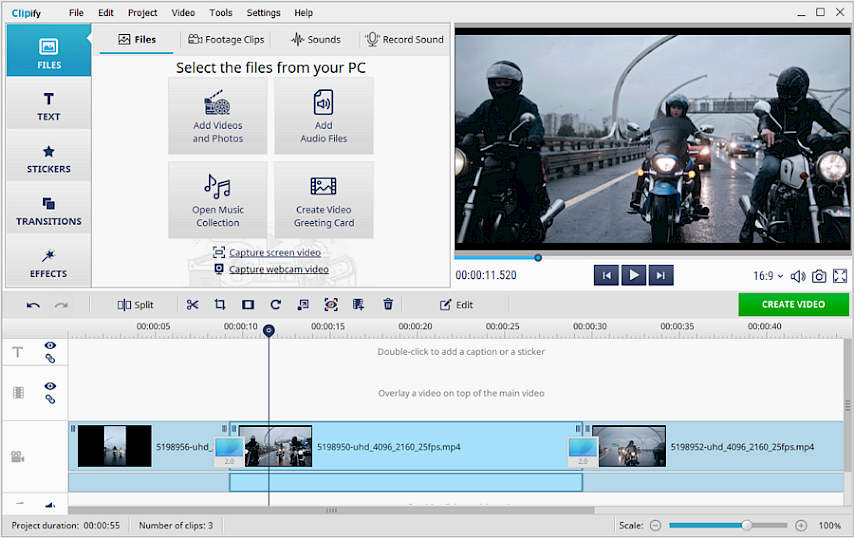
1. Clipify – The Easiest Way to Remove Black Bars (Windows)
If you’re looking for a user-friendly solution that doesn’t require a steep learning curve, Clipify is your go-to. Designed for Windows, this video editing software combines accessibility with powerful features, making it ideal for both beginners and intermediate users.
One of its many useful functions? The ability to easily crop or resize your footage to eliminate black borders—without compromising video quality. Visit this webpage https://clipify.net/how-to-remove-black-bars-from-video.php to learn more about Clipify and this particular feature.
Step-by-Step Guide:
Step 1. Download Clipify and Start Your Project:
- Head to the Clipify website and download the free version of the software. The installation process is quick and straightforward. No advanced setup required.
- Launch Clipify and click “New Project” to start fixing your videos.

Step 2. Add Your Video File:
- Click on “Add Videos and Photos” and import the files that have black bars. Once added, your footage will appear on the timeline below the preview window.

Step 3. Use the Crop Tool to Adjust the Frame:
- Click on your video in the timeline to select it.
- Then, hit the “Crop” icon in the top toolbar. This opens the cropping panel where you’ll adjust the frame to remove black edges.
- Drag the corners or edges of the crop box to fit the part of the video you want to keep.
- Maintain the desired aspect ratio—Clipify lets you choose the original one, 16:9 or 4:3—or opt for the free crop if needed.

Step 4. Preview and Save:
- Once you’re happy with the new frame, click “Save” and then preview your cropped footage in the main window.
- If everything looks good, export your video using the “Create Video” button. You can choose your preferred format and resolution before finalizing.

Why Use Clipify?
- Beginner-friendly interface
- Built-in templates and tools for other editing tasks
- Fast cropping with real-time preview
- Doesn’t require a powerful PC or pro-level knowledge
Drawback? It's currently only available for Windows. But if that’s your platform, you’re in luck—Clipify makes fixing black bars as easy as dragging a mouse.
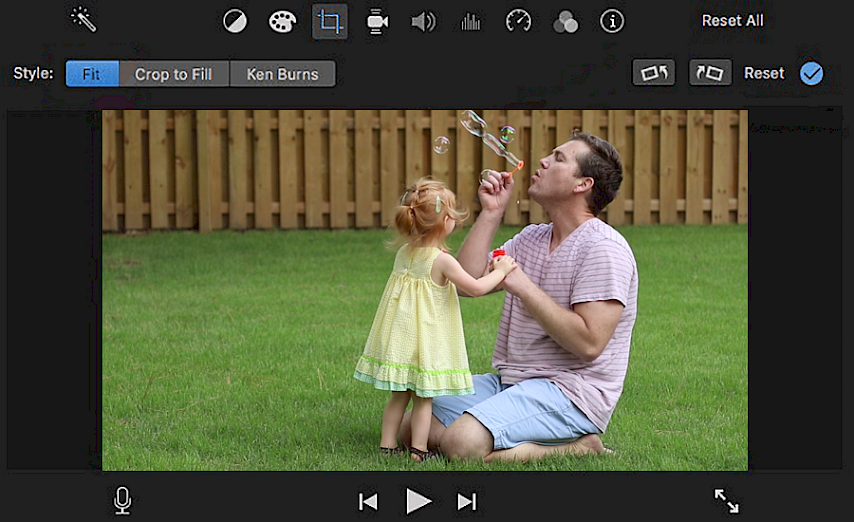
2. iMovie – A Quick Fix for Mac and iOS Users
If you’re using a Mac, iPhone, or iPad, iMovie might already be on your device. While it’s not the most advanced editor out there, iMovie is surprisingly capable of handling basic editing tasks, including removing those unwanted black bars.
Quick Steps in iMovie:
1. Open iMovie and start a new project.
2. Drag your video into the timeline.
3. Click on the video in the timeline to select it.
4. Above the preview screen, click on the "Crop to Fill" button.
5. Adjust the frame manually to remove the black edges.
6. Once you're satisfied, click the checkmark to apply.
7. Export your video via File → Share → File to save your new version.

What I like
- Built into Apple devices
- Simple to use with a clean interface
- Great for quick adjustments and casual projects
What I don't like
- Limited control over aspect ratios
- No advanced features for batch processing or custom export settings
Still, for most Mac users, iMovie is more than enough for basic cropping and a good way to remove black bars without installing additional software.
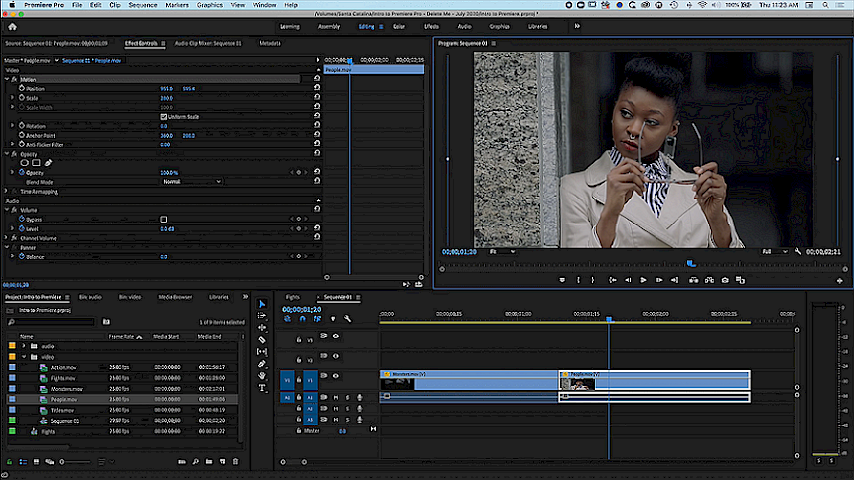
3. Adobe Premiere Pro – Precision and Full Control
When you’re working on a high-end project or need precise control over every frame, Adobe Premiere Pro delivers. This professional-grade editor supports nearly every video format and gives you full access to cropping, scaling, and exporting with perfect control.
The trade-off? It’s complex, and there’s a learning curve. But if you already work with Premiere—or plan to—here’s how to tackle black bars with confidence.
How to Remove Black Bars in Premiere Pro:
1. Import your footage and drag it onto the timeline.
2. In the Effects Controls panel, find the Scale and Position settings under the Motion tab.
3. Increase the Scale slightly until the black bars disappear. You might need to adjust the Position to keep the subject centered.
4. For vertical bars (pillarboxing), stretch width using the Uniform Scale toggle (uncheck it) and adjust width only.
5. Alternatively, apply the Crop effect (found in Effects panel → Video Effects → Transform → Crop) for manual trimming.
6. Export the final result via File → Export → Media, adjusting the resolution and codec as needed.

What I like
- Professional-level control
- Batch editing and presets for multiple files
- Perfect for multi-platform publishing (YouTube, TV, social media)
What I don't like
- Subscription-based (not cheap)
- Can be overwhelming for casual users
But if your work requires precision and polish, it’s worth the investment.
Final Thoughts
Black bars don’t have to ruin your videos—or your workflow. Whether you're creating content for YouTube, preparing a client project, or just editing a family video, the right tool can help you eliminate those distracting borders with ease.
- Want a simple and intuitive solution? Try Clipify—especially if you’re on Windows and want to get rid of black borders on videos without a steep learning curve.
- On a Mac or iPhone? iMovie gives you a quick fix using its built-in cropping tool.
- And if you're looking for professional control, Adobe Premiere Pro offers all the flexibility you could need (and then some).
The best tool really depends on your goals, your gear, and how deep you want to go into editing. One thing is for sure, though—your videos deserve to be seen without distractions.


